A leaky roof can be a homeowner’s worst nightmare, leading to water damage, mold growth, and expensive repairs. Fortunately, many roof leaks can be prevented or addressed with some careful attention. In this guide, we’ll explore the most common causes of roof leaks and provide practical solutions to help you safeguard your home.
Common Causes of Roof Leaks
1. Damaged Shingles
One of the primary culprits behind roof leaks is damaged or missing shingles. Over time, shingles can wear out due to exposure to the elements. Heavy winds, hail, and foot traffic can also contribute to shingle damage. Regularly inspect your roof for missing or damaged shingles and replace them promptly.
2. Poor Roof Installation
Roof leaks can result from improper installation. Ensure that your roof was installed by a reputable and experienced contractor. Faulty flashing or inadequate sealing can lead to water infiltration.
3. Clogged Gutters
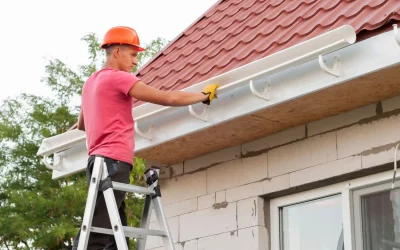
Clogged gutters can cause water to back up and overflow onto the roof, damaging the edges and underlayment. Regularly clean your gutters to prevent this issue.
4. Flashing Problems
Roof flashing is essential for preventing leaks around roof openings like chimneys, skylights, and vents. Damaged or improperly installed flashing can allow water to seep in. Inspect your flashing and repair any issues.
5. Condensation and Ventilation
Poor ventilation can lead to condensation in your attic, which can damage the roof structure. Ensure your attic is well-ventilated to prevent this issue.
Preventive Measures for Roof Leaks

1. Regular Inspections
Regular roof inspections are your first line of defense against roof leaks. It’s essential to inspect your roof, at least twice a year, and after severe weather events. During these inspections, follow these guidelines:
- Examine the roof for signs of damaged or missing shingles. Pay close attention to areas where wind, hail, or foot traffic could have caused damage.
- Check for any visible signs of wear and tear, such as granules from shingles collecting in your gutters. This could be a sign of shingle deterioration.
- Inspect the roof’s flashing, the sealant around roof openings, and the overall integrity of the roofing system.
- Look for any unusual or unexpected changes in the appearance of your roof. Even seemingly minor issues should be addressed promptly to prevent them from becoming major problems.
2. Clear Debris
Regularly removing debris from your roof and gutters is a simple but effective way to prevent roof leaks. Debris, such as leaves, branches, and dirt, can obstruct water flow and create dams that allow water to pool on your roof. This pooling water can lead to leaks and cause damage. Ensure you:
- Keep the roof surface clean and clear of debris.
- Clean your gutters and downspouts, ensuring that they’re free from blockages. Clogged gutters can cause water to overflow and seep into the roof’s underlayment.
3. Professional Inspections
Consider scheduling annual inspections by a professional roofing contractor. They have the experience and expertise to identify potential issues that may not be obvious during a visual inspection. A professional roofer will:
- Thoroughly inspect the entire roof, including the underlayment, flashing, and structural components.
- Identify areas of concern, such as loose shingles, compromised flashing, or signs of water damage.
- Provide recommendations for necessary repairs or maintenance.
4. Invest in Quality Materials
When it comes to roof longevity and leak prevention, the quality of the materials you use matters. High-quality roofing materials, when properly installed, offer better resistance to wear and tear, extreme weather conditions, and UV exposure. When replacing your roof or performing repairs:
- Choose reputable roofing materials known for their durability and performance.
- Ensure that the roofing contractor you hire has a proven track record of installing high-quality materials correctly.
5. Maintain Good Ventilation
Proper attic ventilation is a key element in preventing roof leaks. Inadequate ventilation can lead to moisture buildup in your attic, potentially causing damage to the roof structure and sheathing. To ensure good attic ventilation:
- Inspect your attic for signs of excess moisture, such as condensation on the underside of the roof deck.
- Consider installing additional vents or updating existing ones to improve air circulation.
- Ensure proper insulation is in place to maintain consistent temperatures and reduce the risk of condensation.
Addressing Roof Leaks
Roof leaks can be distressing, but knowing how to handle them promptly and effectively is crucial to minimize damage and protect your home. If you discover a roof leak, follow these steps:
1. Contain the Roof Leaks
The first and most immediate step is to contain the leak to prevent further damage to your home’s interior. To do this, follow these guidelines:
- Place buckets, containers, or towels under the area where the water is dripping to catch the water. Make sure the container is stable and won’t easily tip over.
- If the leak has caused damage to the ceiling, use a screwdriver or a similar tool to create a small hole where the water is pooling. This will allow the water to drain into the container more efficiently.
- Place a tarp or plastic sheet on the floor to protect it from water damage. This is especially important if the leak is affecting electrical fixtures or valuable items.
2. Call a Professional
Once you’ve contained the leak, it’s crucial to contact a qualified roofing contractor as soon as possible. Roof leaks often require professional repair, and attempting to fix them yourself can sometimes lead to further damage or safety risks. When hiring a professional roofer:
- Ensure they are licensed, insured, and experienced in repairing the type of roof you have.
- Provide as much information as possible about the leak’s location, its size, and any visible damage to your roof. This will help the roofer prepare for the repair.
- Ask for a detailed estimate of the repair cost and the expected timeframe for completion.
3. Document the Damage of your Roof Leaks
Documenting the damage is essential, both for your records and for any potential insurance claims. Here’s what you should do:
- Take clear photos of the leaking area, the interior damage, and any affected belongings. Document the extent of the damage and any visible signs of the leak.
- Keep copies of any correspondence with your roofing contractor, including estimates and invoices.
- Contact your homeowner’s insurance provider to report the damage. They may require photographic evidence and estimates for reimbursement.
4. Temporary Fixes on Roof Leaks
In some cases, while waiting for the professional roofer to arrive, you may need to apply temporary fixes to minimize the damage. These temporary measures can include:
- Using roofing cement or a roof patching kit to seal the area where the leak is coming from. Be cautious when doing this, as it’s a short-term solution.
- Placing a tarp over the damaged area, securing it with roofing nails or heavy-duty tape to divert water away from the leak.
Remember that temporary fixes are just stopgap measures and should not replace professional repairs. A roofing contractor can identify the root cause of the leak and provide a lasting solution to prevent future leaks.
In summary, addressing roof leaks should be approached with promptness and caution. Containing the leak and getting professional help quickly can minimize the extent of the damage and help protect your home’s structural integrity. Documenting the damage is essential for insurance claims, and while temporary fixes may be necessary, they should be considered temporary and not permanent solutions. Roof leaks are best addressed by professionals with the skills and expertise to ensure a long-lasting repair.


